DIY|Free|TopHat|Tutorial|Gothic|Steampunk|Accessories
"This won't work.", I told myself. As an artist, the number one thing you should never do is doubt yourself. I've learned this over the years and somehow I still manage to doubt myself every time I create something new.
After a few hours, some hard work and "do-overs" I looked at the new hat I created and said, "This is absolutely gorgeous!".
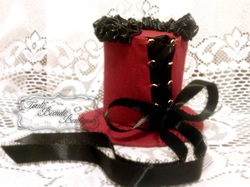
So now, I am pleased to introduce the new free tutorial for all! Inspired by a little Steampunk, with a touch of Gothic, a new not-so-mini top hat is born. With a little inspiration from the original, now anyone can make a top hat of their own for any occasion.
Skill Level: Beginner to Intermediate
Supplies Needed
1/4 yard Fabric or craft felt (about 2 pieces of 8x11 or larger)
Sturdy Craft felt or craft foam for "skeleton" of hat
Adhesive (I prefer a hot glue gun)
Scissors
Round object or template for top hat (available at the end of the blog)
Embellishments (I used ribbon and jump hoops/jewelry hoops)
Iron (to get out stubborn wrinkles)
Coffee (optional, but makes a great addition when trying to work)
Finished Measurements: Hat measures approximately 3.5" tall, 3" diameter, 4" brim/base
There are many different ways to make a top hat, including using a form of wire to make the brim bow on the sides or making the hat wider at the top than on the base, but this is just a basic way of making a top hat.
Trace your round object or print the template. (the template should be printed at 100% and has a 1 inch box for reference. If you don't mind your hat being a bit bigger or smaller then don't worry about the size.)
Cut out all pieces. When cutting fabric/felt for the design of the hat (not the skeleton) you will need to add 1/4" seam allowance all the way around your pieces so that they can be glued under without the fraying shown.
Glue your body foam/felt skeleton piece inwards first! Make sure the tabs are pointing in as to reduce bulk on the hat. Move to the brim, gluing one side of fabric down. Make slits all the way around your fabric circle for gluing tabs. Stretch the tabs gently and glue to the center of your brim on the opposite side. Repeat for the top smaller circle of the hat. Glue the second larger circle to the brim of the hat to cover the tabs and cut off excess. This will be the bottom so you will not need to worry about it looking its best.
Finally glue the last fabric piece to the top hat "body" by folding the fabric in 1/4" on both the top and bottom. When you get to the end you can fold the fabric under and glue to create a seam. This seam can be covered by embellishments if you don't want it to show or it can be the back of the hat. Then glue all pieces together carefully with small amounts of glue working in small sections so that the glue will not show on the outside of the hat.
You can add the hat to a headband or a hair clip so it can sit on the head if you would like! If these above directions are confusing take a look at the video here:
Free - Top Hat Tutorial Video
Here is the free PDF template for the Top Hat:
"This won't work.", I told myself. As an artist, the number one thing you should never do is doubt yourself. I've learned this over the years and somehow I still manage to doubt myself every time I create something new.
After a few hours, some hard work and "do-overs" I looked at the new hat I created and said, "This is absolutely gorgeous!".
So now, I am pleased to introduce the new free tutorial for all! Inspired by a little Steampunk, with a touch of Gothic, a new not-so-mini top hat is born. With a little inspiration from the original, now anyone can make a top hat of their own for any occasion.
Skill Level: Beginner to Intermediate
Supplies Needed
1/4 yard Fabric or craft felt (about 2 pieces of 8x11 or larger)
Sturdy Craft felt or craft foam for "skeleton" of hat
Adhesive (I prefer a hot glue gun)
Scissors
Round object or template for top hat (available at the end of the blog)
Embellishments (I used ribbon and jump hoops/jewelry hoops)
Iron (to get out stubborn wrinkles)
Coffee (optional, but makes a great addition when trying to work)
Finished Measurements: Hat measures approximately 3.5" tall, 3" diameter, 4" brim/base
There are many different ways to make a top hat, including using a form of wire to make the brim bow on the sides or making the hat wider at the top than on the base, but this is just a basic way of making a top hat.
Trace your round object or print the template. (the template should be printed at 100% and has a 1 inch box for reference. If you don't mind your hat being a bit bigger or smaller then don't worry about the size.)
Cut out all pieces. When cutting fabric/felt for the design of the hat (not the skeleton) you will need to add 1/4" seam allowance all the way around your pieces so that they can be glued under without the fraying shown.
Glue your body foam/felt skeleton piece inwards first! Make sure the tabs are pointing in as to reduce bulk on the hat. Move to the brim, gluing one side of fabric down. Make slits all the way around your fabric circle for gluing tabs. Stretch the tabs gently and glue to the center of your brim on the opposite side. Repeat for the top smaller circle of the hat. Glue the second larger circle to the brim of the hat to cover the tabs and cut off excess. This will be the bottom so you will not need to worry about it looking its best.
Finally glue the last fabric piece to the top hat "body" by folding the fabric in 1/4" on both the top and bottom. When you get to the end you can fold the fabric under and glue to create a seam. This seam can be covered by embellishments if you don't want it to show or it can be the back of the hat. Then glue all pieces together carefully with small amounts of glue working in small sections so that the glue will not show on the outside of the hat.
You can add the hat to a headband or a hair clip so it can sit on the head if you would like! If these above directions are confusing take a look at the video here:
Free - Top Hat Tutorial Video
Here is the free PDF template for the Top Hat:
| free-top-hat-template.pdf |
** Seller friendly! Just note a credit would be much appreciated, thank you.
** The pdf is secured and watermarked so no one can try to sell the free template.
If you've made a hat with this tutorial I would love to see it! Post it here in the blog, email it (contact tab is great for that), post it on the shop's Facebook page, or pin it on Pinterest.
** The pdf is secured and watermarked so no one can try to sell the free template.
If you've made a hat with this tutorial I would love to see it! Post it here in the blog, email it (contact tab is great for that), post it on the shop's Facebook page, or pin it on Pinterest.


 RSS Feed
